How To Make Delicious Strawberry Jam


Strawberry Jam - Delicious and Fun
I love making delicious, homemade strawberry jam. I have a lot of fun with it albeit there is usually a sticky mess that goes along with the process. You will need only a simple recipe, a little bit of time, and a little bit of know how to complete the project. You have to follow a strict regiment but -- RELAX -- jam is not that complicated.
This is a great way to get started in canning if you have ever wanted to try it. I used to help my mother make great jam and other canning goods when I was a little girl. It was a neat way to spend time as her little helper. I usually got to stir the pot for her and help cut up the fruit. I always got the messy jobs.
When spring hits strawberries are in season and super cheap at the market. I tend to buy them anyway throughout the year. Sometimes, I have some that may turn on me before I can use them up -- so I pop them in the freezer. You can use fresh or frozen berries for this recipe if you like. The recipe and methods are the same.
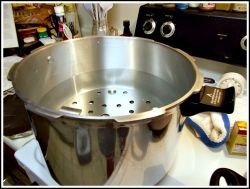
Pressure Canners as Water Baths
I am using my pressure canner as a water bath for this process. Strawberry jam is a low acid food so there is no need for it to be pressurized. Before you start pulling all the ingredients out for your jam making, wash your canner with hot soapy water, rinse well, and fill it at least half full with water. Set it on your stovetop on medium heat. You will want the largest burner you have under it for consistent boiling. As the water heats up your water bath will be hot enough when your jars are filled and ready for processing.
Presto 1755 16-Quart Aluminum Pressure Cooker/Canner

First Things First!
Make sure all the equipment is ready before jumping into the recipe. Things go a lot smoother when these projects are organized.
Sterilize Your Equipment!

Sterilize Tools & Equipment
For Safer Food Processing
Set up a production line for canning. Sterilize most of the items that will be used. I put my jars in the dishwasher after I wash them by hand. This not only cleanses the jars but it adds an extra precaution against bacteria and organisms being present. All of my ladles, rings, jars, and tools will be dropped into the water bath for added sterilization.
Just like sterilizing baby bottles -- drop the items into boiling water and let set for about 10 minutes. Remove and let air dry. I generally set the jars back into the canner to keep them hot for when the jam is ready to scoop into them.
Keeping the jars hot is important. When the jam mixture is put into a hot jar it will not suffer the possibility of breakage due to temperature changes. You can use the jars straight out of the dishwasher but you have to keep the door on it closed. If you open it the jars will cool off.
Canning Tools

Necessary Canning Tools
During processing a few canning tools can help avoid burns. The jars and the water bath are going to be extremely hot so use caution around this equipment. There are specialized tools for each step in canning.
- The jar grabber is the most important tool in this group. It helps get those hot, heavy jars in and out of the canner easily and has a special rubber coating to help grip the slippery glass jar.
- The lid lifter has a magnet in the end of it so the lid sticks to it and holds it snug while setting it on the jar.
- The spacing tool has slots on the end of it for checking the head room required in a processed jar. Each food has a different requirement. It can also be used to slide into the interior side of the jar to remove air bubbles. The spacing on strawberry jam is 1/4".
A complete kit of canning tools is a great way to get all of the ones you want and need in a set. The boxed set includes the Jr lifter, spacer tool, lid lifter, and funnel for around $7 to $9. They are available on Amazon or in your local retail shops like Walmart.
Simple Strawberry Jam Recipe
A strawberry jam recipe contains
only 5 simple ingredients!
Rate This Recipe
Strawberry Jam Ingredients
- 5 quarts Strawberries - fresh or frozen, Mashed
- 1 package Pectin
- 7 cups Sugar
- 1/4 cup Lemon Juice
- 1 tablespoon butter
Cook Time
Instructions
- Rub the side of a large stock pot with the butter and let the butter stay in the pan. This prevents boil overs and adds a nice favor to the jam.
- Add the mashed berries, pectin, and lemon juice to a large stock pot. Bring them to a boil.
- Gradually add the sugar and mix it into the strawberry mash. The jam will darken as it simmers back to a boil.
- Remove foam as needed. When the mixture reaches a rolling boiling point, let it roll for about 10 minutes.
- Fill a hot jar with mixture leaving a 1/4" space between the top and the jam.
- Wipe the lip of the jar off to insure proper sealing.
- Snug the ring down just til it stops turning. The ring should not be too tight.
- Place in water bath canner for 10 minutes of boiling time. The water in the canner should be at least 3" above the jars.
- Remove the jars and let set overnight on dishtowels. Do not move the jars until they set.
- Mark the dates on the lids. The jam will keep up to a year.
Strawberry Jammin' - Video For Jam Making - Step By Step Guide For Strawberry Jam
The steps you need to take to preserve your own strawberry jam are featured in this video. This was the actual process I followed when I made this batch of tasty jam!
Preparing Strawberries
Cut Or Thaw Fruit
You can see from the recipe you are going to need a lot of strawberries! 2 quarts mashed down is about 5 store bought pints. I happened to have set aside just that amount of strawberries in the freezer. When doing fresh berries, cut the tops off of them and remove any dark or greenish white spots. Rinse the berries well before you cut them up and drain the water off of them
For strawberries that are frozen (you can buy frozen berries to do this!) let them thaw out overnight in the fridge or put them in a pan of cold water and separate them. Drain excess water out. You do not want the jam watered down.
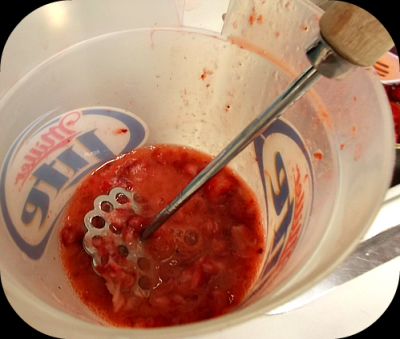
Adding Pectin
For Sugar And Sugar Free Jam
Stirring is a large part of the work that goes into making homemade jam. If your Pectin is lumpy don't worry, it will dissolve as the jam heats up. Stir until you get a soft boil. When this happens it's time to add all of that sugar!
There are sugar-free Pectin powders available on the market. If you want to use one of these for your jam instead of sugar, I recommend using the sweetener Stevia. It is a naturally produced sugar substitute and it will not leave you with a chemical aftertaste.
When the sugar is added you are about half-way done with cooking the jam!
About reduced sugar pectin...
If you have seen these, they are less sugar because they are only 1/2 of a full batch of jam so be aware of that. They make only 6 half-pints where this recipe is for 12 half-pints.

Foaming Will Occur
As Jam Is Brought To A Boil
Foaming will naturally occur as the sugar and fruit begin to heat to the boiling stage. Remove this with a wooden spoon. Never use a metal utensil with preserving. The metals interfere with the acids in the food and cause problems.
Scoop the foam off and set it aside in a container. You can use this later. It is edible. It is unsightly in the sealed jars and it is customary to just take it out. We put it on toast or eat it on pancakes. Sometimes its the taster that everyone eats before the jars are processed!
Cut down the foam by adding a tablespoon of butter. This adds a nice buttery flavor to your jam, too. Butter wiped around the top inside 2" of the pot will help reduce the chance of boil over.

Time To Put The Jam In Jars!
Careful, This Stuff Is HOT!
When you have a slow rolling boil in your jam you will notice the jam is darker. It is a nice glaze and it is ready to go into the jars and be sealed with the lids and rings for processing. Take care when moving through this step. The jam, the jars, and the water bath are extremely hot. You will suffer burns if you are not cautious! So tread carefully, my friend!
I put a bowl out so I can set the jar in it and keep my area a little neater. You will be making a mess! Thankfully it wipes up easy when its done. If you don't get it all over the place it isn't any good so go at it!
Place a hot jar in a bowl, drop the funnel into the jar and scoop the hot liquid into it. Leave a 1/4" space in the top. Strawberry jam does not expand when it sets. Wipe off the top ridge and set a hot jar lid on top of it. Add a ring to it and snug down just till it tightens. Do not over tighten the band.
Set the jar back in the middle of the stove to keep it hot. When you fill all of your jars you may move them to the water bath. 10 minutes of boiling time and you are done!


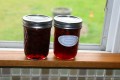
Half -Pint Jars After Processing

Remove Jars
Let Sit Covered For 24 Hours
Covering the jars after you have removed them from processing helps them cool slowly. It also prevents a mess if you have a jar that explodes. Yes, they do that if you have one with a flaw in it. This does not happen very often, no worries!
I love the sound of the popping when the seal sets. They will salute you as they set.
Let the jars sit for about 24 hours before you move them to give them time to settle. It gives you time to plan how you are going to devour all that yummy jam!
Always Write The Date of Processing on the Lid

Start your canning experience with delicious, homemade Strawberry Jam and you will be able to move on to other preserving easily. The steps for canning are very similar to the jam process. From this you can move on to bottling fruits and other preserves.
I hope the instructions were clear enough to help you along and you have what you need to start canning on your own now.
I have 9 jars of jam left, who wants one?
Thanks for visiting!